How to Configure Single Sign-On (SSO)?
What is SSO?
Single sign-on (SSO) allows you to give your team members access to your Terminus using your company Identity Provider (IdP). Terminus supports Security Assertion Markup Language (SAML) version 2.0, allowing authentication of team member logins deferred to the Identity Provider (IdP).
Most popular Identity Providers (including Okta, OneLogin, Microsoft Azure AD, and others) support SAML 2.0 protocol.
If your plan supports it, you can configure SSO in your Terminus account.
Here are the steps for a generic setup. It can be applied to any Identity Provider supporting SAML 2.0.
1. Go to the Single Sign-On setup page
From the top navigation, click on Account Settings in the dropdown.

Go to the Single Sign-On tab

Check to Enable SAML SSO

2. Configure settings in your Identity Provider
Once you enable SSO in your Terminus account, you’ll see some configuration information (on the right side) that can be used to configure your Identity Provider (IdP).
In a new browser tab, visit your IdP admin control panel.
a. Create a new Single Sign-On application in your IdP
This step is unique to each IdP. Please follow the instructions based on their documentation to create a new SAML 2.0-based SSO application.
You can call it Terminus. You can also add a logo to make it easy to look for it.
Logo with name:

Emblem:

b. Configure Assertion Consumer Service (ACS) URL
Once you create a new SAML application, configure ACS URL from your Terminus settings. It looks something like this:
https://app.terminusapp.com/auth/saml/callback?uid=<your unique id>
Some services call it Single Sign On URL. If your IdP requires it, the same value can be used as Recipient URL and Destination URL.
c. Configure Service Provider (SP) Entity Identity
Copy your Terminus SP Entity ID. It looks something like this
https://app.terminusapp.com/<your unique id>
This is used to uniquely identify Terminus within your IdP. Based on the IdP, they may use terms such as Audience URI, SP Entity ID, Identifier, etc.
d. Configure Name ID Format
You need to tell your IdP to use the user email address as the identity. Based on your Idp, they may use terms such as Unique User Identifier, Name ID Format, Application Username, etc.
Some of the common predefined values can be EmailAddress, Email, user.mail, etc.
e. Save the settings
Once you configure the above settings, save them in your IdP account.
3. Configure settings in your Terminus account
Once you have configured a SAML 2.0 SSO application in your IdP account, it can then be used to complete your SSO setup in Terminus.
a. Copy the Single Sign-On URL and paste it into your Terminus settings

The above example shows the URL for Microsoft Azure AD-based login.
Your IdP may refer to it as Login URL, Single Sign-On URL, or something else.
b. Download or copy the certificate and paste it into your Terminus settings
Paste the entire text that begins with —–BEGIN CERTIFICATE—– and ends with —–
END CERTIFICATE—–

The above is just an example. You will need to use your own certificate.
c. Force SSO (Optional, but recommended)

This setting requires team members to log in using your Identity Provider (IdP) and disables password-based login for them. This enhances security by ensuring users authenticate through your company's standard procedures.
Members with admin privileges are always exempt and can log in with a password. This ensures you can access your account even if your SSO configuration has errors.
You have two flexible ways to control which users are required to use SSO: by their email domain or by their group membership.
I. SSO Domains (Recommended)
Specifying SSO domains is the preferred and most direct way to enforce SSO for your internal employees while automatically allowing password access for external collaborators, such as agencies or contractors.
You can specify which email domains should be forced to use SSO by entering domain names (one per line) in the SSO Domains field.
For example:
company.com
subsidiary.com
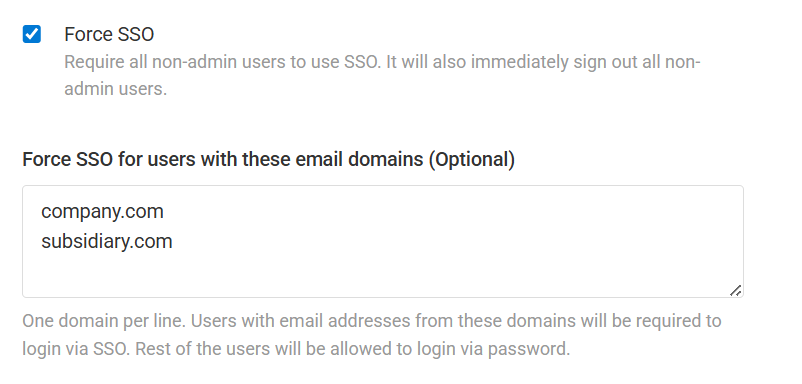
If you specify domains: Only users with email addresses from these domains (e.g., [email protected]) will be required to use SSO. Any user whose email domain is not on this list will be able to log in with a password.
If you leave this field empty: All non-admin users in your account will be forced to use SSO (unless they are in a group with a password exception).
This gives you precise control, making it easy to roll out SSO internally without affecting external partners.
II. Allow Password Access for Group (Optional)
As an alternative or additional control, you can allow a specific group of users to log in with passwords even when Force SSO is enabled. This is useful for managing exceptions for specific sets of users who cannot use your company's IdP.
For example, if you work with an external agency:
1. Create a group named External Users(Non-SSO) (no specific permissions are needed).
2. Add the agency users to this group.
3. Select the External Users(Non-SSO) group in the Allow password access for group dropdown.

Users in this selected group will be allowed to log in via password.
Note on Precedence: The group-based exception takes priority over domain-based enforcement. If a user is a member of the selected "password access" group, they will always be allowed to log in with a password, even if their email domain is listed in the SSO Domains field. Admin users are also always exempt from forced SSO.
4. Auto-provisioning users (Optional)

Our Single Sign-On (SSO) solution offers just-in-time user auto-provisioning. This eliminates the need for manual user creation in our system. Whenever a new user is added to your identity provider (IdP), their account is automatically created in our system based on pre-configured permission attributes when they try to login for the first time. This ensures seamless user access and reduces administrative overhead.
5. Save Single-Sign-On settings
When you click Save, SSO will be activated on your account.
6. Add or remove users
a. Your Identity Provider (IdP):
- Adding Users: Follow your identity provider’s instructions to add users and grant them access to the Terminus application.
- Removing Users: Follow your identity provider’s instructions to remove users.
b. Terminus Application:
-
Adding Users:
-
Manual Addition: When adding a user in Terminus, use the same email address as in your identity provider to ensure a match between the two systems.
Auto-provisioning: When enabled, users added to your identity provider are automatically added to Terminus.
- Note: Auto-provisioning currently supports adding users but does not support de-provisioning. Therefore, you must manually remove users from both your identity provider and Terminus.
-
- Removing Users Manually: To remove users from Terminus, you need to manually remove them from both your identity provider and the Terminus application.
When auto-provisioning is disabled, both adding and removing users must be done manually in both your identity provider and the Terminus application.